Author: Natalie Hoidal
It's garlic planting season. Here are a few quick tips to guide you.
1. Delaying planting due to heat?
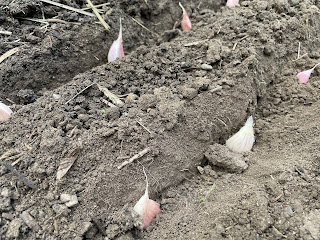 |
| Garlic planted with 6” row spacing and 6” between cloves in a raised bed. Photo: Natalie Hoidal |
2. Soils and fertility
Plant your garlic into a well-drained field. While garlic is a heavy nitrogen feeder, we recommend adding only about 1/4 to 1/3 of your nitrogen before planting. This is in part because nitrogen is very mobile in the soil. Your garlic will wait until spring to do most of its growing, and thus doesn't need a lot of nitrogen until then. If you apply all of your nitrogen now, you risk having some of it leach out of your soil before your garlic plants are able to use it.
- Low organic matter (<3.1%): 120 pounds N
- Medium organic matter (3.1-4.5%): 100 pounds N
- High organic matter (>4.19%): 80 pounds N
- Organic soil (>19%): 50 pounds N
However, both P and K should ideally be incorporated before planting. If you're using composted manure as your main fertilizer source, consider applying all of your composted manure in the fall to meet your P and K needs, and then supplementing with a nitrogen source in the spring to fulfill the rest of your garlic's nitrogen leaves.
Check out the full Growing Garlic in Minnesota guide to calculate your P and K requirements. If you need help understanding your soil test or choosing amendments, do not hesitate to reach out.
3. Check your "seed" garlic
Make sure your seed garlic has been tested for garlic bloat nematode. The seller should be able to provide confirmation to you that your garlic is clean. If you're saving garlic cloves from your own crop, be sure to have it tested every so often, even if you're not selling it. Additionally, check your garlic cloves for off-colors and streaks. Some garlic growers experienced aster yellows this year, and infected cloves will not produce viable bulbs.
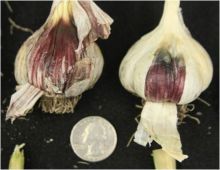 |
| Aster yellows symptoms in garlic. Photo: Michelle Grabowski |
For more information on growing garlic, read the full growing guide here.

Comments
Post a Comment