Cutting seed: impacts on yield, tuber size, and disease pressure
Due
to the warm spring weather, many growers are getting ready to plant
potatoes ahead of schedule. While you’ve likely already decided how
you’ll be cutting your seed (since it influences the amount of seed you
ordered), there are some things to consider as you proceed.
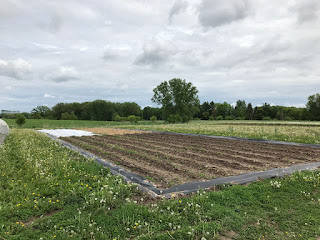
Size of cuts and planting density
A
lot of research has gone into figuring out the optimal cut size and
planting density for potatoes. There are tradeoffs no matter how large
your seed pieces are, and how much space you leave between seed
potatoes.
In general, larger pieces produce higher yields, with
diminishing returns after ~2.5 oz. If you’re cutting your seed potatoes
into pieces larger than 2.5 ounces, the increase in seed cost tends not
to justify the larger pieces. Larger pieces can also cause problems with
mechanical planters (though my sense is that most of the folks who read
this newsletter plant by hand anyways). Discard pieces smaller than 1.5
oz, as they are unlikely to produce vigorous plants. Every single piece
needs to have at least one eye, as these are the structures that form
stems.
The interaction of seed potato piece size and spacing determines the stem density in the soil.
- High stem density occurs with larger pieces (with more eyes), and closer spacing (~8 inches). A higher density of stems tends to result in fewer tubers per stem, and smaller potatoes overall, but it also results in higher yields.
- Low stem density occurs with smaller pieces and
wider spacing (~12 inches). Fields with low stem density are less
productive overall, but individual tubers tend to be larger.
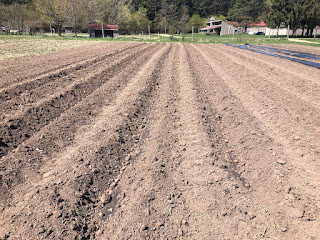 |
| Narrow spacing (in this case ~8 inches) tends to result in higher yields, but smaller potatoes. Image: Natalie Hoidal |
If
your customers like smaller potatoes and your priority is higher
yields, opt for high stem density, aka pieces nearing around 2.5 ounces
with closer spacing. If you want large potatoes, use wider spacing or
smaller pieces. For a happy medium, go with moderate spacing (e.g. ~10
inches).
Proper healing
After
cutting your seed potatoes, it’s critical to give your potatoes the
time and conditions to heal properly before planting. Potatoes that
don’t heal properly are more susceptible to diseases.
Start with
clean supplies and a suitable environment. Make sure to use a clean,
sharp knife, and sanitize it regularly. If you’re using a mechanical
cutter, clean and sanitize it at least once per day. Following cutting,
potatoes should be kept at 50-55 F with plenty of air flow and high
relative humidity. Plant 3-4 days later. Planting too soon can prevent
your potatoes from healing properly, but waiting more than 4-5 days can
also cause problems.
There are a number of biocontrol products
that can help to reduce disease pressure when applied during tuber
cutting, or applied into the furrow at planting. Trichoderma harzianum is a fungal product (often sold as RootShield) that has been shown to reduce disease pressure from late blight, Fusarium sambucinum (which causes sprout rot and seed piece decay), and Rhizoctonia solani (which causes stem canker & black scurf) (Wharton et al., 2012, Wharton et al., 2014, Wilson et al., 2008). Bacillus subtilis bacteria also showed promising disease prevention potential against late blight and Fusarium sambucinum (Wharton et al., 2012 & 2014). B. subtilis can be found in a variety of biocontrol and biostimulant products.
Green sprouting / chitting
Green sprouting or chitting is one strategy for growing earlier potatoes, and it can also give growers a leg-up on potato beetles and leafhoppers (which tend to emerge later in the summer). Potatoes that have been pre-sprouted are a lot like seeds that have been started indoors: they get a head start indoors and so they grow more quickly when they’re moved to the field.The basic process is: Expose seed potatoes to conditions that induce sprouting (40-50% relative humidity, diffuse light, 55-60 degrees F). The length of time varies; many growers do this for a period of 2-12 weeks. The longer they are in these conditions, the more they will age physiologically.
This results in sprouting, which tends to result in more stems per plant, faster emergence, faster canopy development and tuber development. Potato plants that experience chitting tend to produce higher yields with more tubers per plant, but the potatoes produced tend to be smaller. The longer they are left in prouting-inducing conditions, the more the sprouting process progresses (to a point - after around 10 weeks other problems can occur). Some evidence suggests that later maturing cultivars need to be chitted for a longer period of time than early maturing cultivars in order to see a response. As a basic guide, potatoes should be cut, healed, and planted when the sprouts turn green (or in some cases purple).
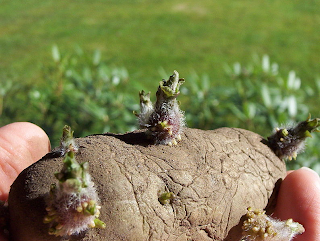 |
| Image: potato that has been green sprouted. Photo: WikiMedia Commons, Mathias Karlsson |
Irrigating to prevent hollow heart and improve yields
Hollow
heart, the formation of an irregularly shaped hole in the center of
potatoes, is caused by alternating periods of rapid and slow growth. This is especially likely to happen in the period right after potatoes flower (aka mid-July when watering potatoes is at the very bottom of your to-do list).
Hollow
heart does not affect the flavor or safety of potatoes, but customers
who purchase potatoes with this condition may think that something is
wrong and throw them out, or choose to purchase from someone else in the
future. In addition to managing irrigation water to maintain consistent
moisture in your potato plantings, make sure you’re not
over-fertilizing, Larger tubers are more prone to hollow heart, so
variety selection also plays a role.
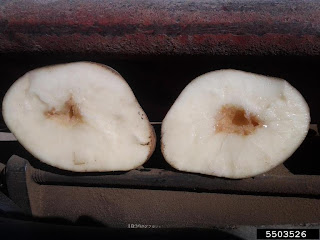 |
| Hollow heart. Image: Ben Phillips, Michigan State University, Bugwood.org |
Colorado Potato Beetle
Whether
it be the large, brightly colored adults or the juicy grubs, the
perpetually hungry Colorado potato beetle (CPB) is one of the most perturbing
potato pests. Its tendency to quickly evolve resistance to different
chemistries causes issues for both conventional (over 50 active ingredients) and organic growers (some farms create their own Spinosad resistance).
A
note about potential resistance. While CPB is prone to developing
them, it is also worth checking out your spray equipment and making sure everything is working the way you think it is.
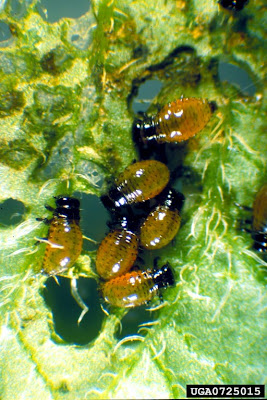 |
| Smaller larvae like those pictures above are easier to manage with insecticides. Photo: C. Trouvé, Service de la Protection des Végétaux, Bugwood.org |
For a full list of recommended products, see the Midwest Vegetable Production Guide. It is very important to rotate modes of action for this pest, so make sure to look carefully at what you are using on your farm.
For organic growers, apparent spinosad (entrust) resistance is cropping up on Minnesota farms. Neem and Bt can be effective if used preventatively. This means the products are on the plants when grubs are young and small. At this age, they are more susceptible to these products. This makes noting egg masses important, as when larvae hatch (typically 7-10 days after being laid) they are most vulnerable.
There are some cultural and physical controls that, when used in combination with each other, can help with management.
In Minnesota on-farm trials in 2020, it was found the eggplant trap crops and flaming did not help reduce colorado potato beetle numbers. Trenches were questionably effective, but fairly cheap and quick to install. While potato beetles are voracious and quick to evolve resistance, they aren’t particularly graceful or smart, a trait trench traps rely on. Colorado Potato Beetle spends the winter close to wherever they were feeding in the fall. When adults re-emerge in the spring, they generally walk to wherever they are going to feed (adults later in the season fly). This is why rotation over large landscape scales is helpful (though not possible for many farms). Trenches substitute physical distance for a slippery dip in the soil, which beetles either fall into (and get trapped) or just seemingly avoid altogether.
Trenches should be set up at least one week before adult potato beetles start to emerge. A Minnesota trail had good success with a trench made with two passes of discs in both directions. More formal recommendations call for trenches to be one to two feet deep and six to 24 inches wide, with sides that angle between 65 and 90 degrees. Line the trench with plastic mulch (you may need landscape staples to pin plastic to the bottom of the trench).
Another cultural practice to consider is straw mulch. In 2020 Minnesota trials, a thick straw mulch reduced beetle numbers and helped suppress annual weeds. Apply mulch at a time when you’ve been able to do at least one cultivation pass for weed control. Note that this strategy won’t help with perennial weeds.
Row covers early in the season can help hold off beetles for the first part of the season. Make sure to remove cover before humidity picks up, as the cover can create a contained, moist environment where foliar diseases thrive.
Postharvest Handling and Washing
- If you are going to prepare potatoes for storage in the fall/winter, do not wash them with water or they may mold.
- Dry them until the soil is hard, and then dry or gently rub off the soil. If you soil is loose, you may just need to lightly brush off or it may simply fall off on its own.
- To prepare potatoes for the farmers market, farm to school, or other consumption that will be relatively soon, wash potatoes in a stream of water with a high pressure hose on a spray table.
- Dunk to loosen the soil if needed prior to spraying, depending on the amount of soil present. Many people use a shallow tote with drainage to dunk the potatoes into clean water in a livestock tank.
- Many growers use a barrel washer, which is a long cylindrical piece of equipment that tumbles the crop while spraying it with water.
- This device works by slowly rotating a barrel as water is sprayed into it. The agitation removes dirt from the produce being washed
- The Grindstone washer (pictured below) is able to wash 2 bushels of vegetables every 2-3 minutes.
- Root washers require require electricity and water to function.
- You must cure potatoes before putting in the barrel washer

Post-Harvest Rots
Post-harvest disease issues in potatoes can be caused by a variety of pathogens, many of which are bacterial (read: extra hard to deal with). These include soft rot and black leg.
Regardless of cause, the basis for control is similar across many of these diseases. These general practices help with multiple soft rot diseases, as bacterial pathogens have similar biology (for example, spreading with water, entering plants that have already been wounded).
- Starting with clean seed
- Look for seed with certified zero black leg from a reputable supplier
- If cutting your own seed, regularly sanitizing tools
- Plant in well-drained sites
- Do not over-irrigate
- Scouting for wilting, yellowing plants during the season and investigating for stem lesions and melting tubers - remove these plants, and if the stem is black, submit it to the UMN Plant Diagnostic Lab
- Avoid harvesting during wet periods
- Disinfect storage areas
- Minimize bruising at planting and harvest
- Sort out iffy potatoes before storage
For a more in-depth look at common postharvest disorders, see this 2019 article from the Fruit and Vegetable News.
References and further reading
Bohl, W.H., J.C. Stark, C.S. McIntosh. 2011. Potato seed piece size, spacing, and seeding rate effect on yield, quality and economic return. American Journal of Potato Research 88: 470-478.
Chang, D. C., J.H. Cho, C.G. Cheon, S.J. Kim, J.H. Nam, Y.I. Jin. 2020. Effects of chitting duration on early maturation of potatoes in a short season environment. American Journal of Potato Research 97: 43-53.
Knowles, L.O. Knowles, N.R. 2016. Optimizing tuber set and size distribution for potato seed (Solanum tubersosum L.) expressing varying degrees of apical dominance. Journal of Plant Growth Regulation 35: 574-585.
Nolte, P., N. Olsen, W. Bohl, S.L. Love. 2020. Seed and Planting Management. In: Stark, J., M. Thornton, P. Nolte (eds) Potato Production Systems. Springer, Cham. https://doi.org/10.1007/978-3-030-39157-7_7.
Nielsen, M. W.M. Iritani, L.D. Weller. 1989. Potato seed productivity: Factors influencing eye number per seed piece and subsequent performance. American Potato Journal 66: 152-160.
Wharton, P.S. W.W. Kirk, R.L. Schafer, P. Tumbalam. 2012. Evaluation of biological seed treatment in combination with management practices for the control of seed-borne late blight in potato. Biological control 63: 326-332.
Wharton, P.S., W.W. Kirk. 2014. Evaluation of biological seed treatments in combination with management practices for the control of Fusarium dry rot of potato. Biological Control 73: 23-30.
Wilson, P.S., P.M. Ahvenniemi, M.J. Lehtonen, M. Kukkonen, H. Rita, J.P.T. Valkonen. 2008. Biological and chemical control and their combined use to control different stages of the Rhizoctonia disease complex on potato through the growing season. Annals of Applied Biology 153(3): 307-320.
Wurr, D.C.E. 1974. Some effects of seed size and spacing on the yield and grading of two maincrop potato varieties. Journal of Agricultural Science 82: 37-45.

Comments
Post a Comment